Dragon Install

Dragon Install is one of Sol Badguy's Overdrive Attacks. It is a technique in which an individual unleashes their powers as a Gear, and allows for a substantial boost in strength, speed, regeneration, and magic power.
It has four variants: Order-Sol's Dragon Install: Sakkai/Morbid World (ドラゴンインストール:殺界, Doragon Insutōru: Sakkai?) and Flame Distortion (フレイムディストーション, Fureimu Disutōshon?), and Sol's Dragon Install 2nd (ドラゴンインストールセカンド, Doragon Insutōru Sekando?) and Heavy Mob Cemetery (ヘビモブセメテリ, Hebi Mobu Semeteri?).
Story
Dragon Install is a technique in which Sol removes his Gear Cell Suppressor, unleashing his original power as a Gear, and is likely named after "installing a power of a dragon into himself" (especially since dragons are a high-level Gear and in ode to Sol's fire-based nature). He gains massive power, but loses control of his emotions, so Sol dislikes reckless use of it.[1] Whenever he does so, his body flashes a silhouette, as if to contain an inner beast. In truth, this may be him holding back his transformation. In his Order days, the silhouette had wings and a long tail, which suggests that he learned to repress it almost entirely.
So far, there are times Sol has been forced to use this attack to go all out against opponents he can't merely run over, with the likes of both Dizzy, Ky and I-No being the ones to force him to go all out by forcing him into this state permanently throughout the fight.
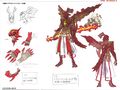
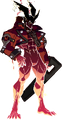
However, each time he uses it, the "seed"[1] of the Absolute World[2] inside of Sol accelerates in growth, causing notable changes to his appearance and abilities,[1] and acquiring the Backyard's abilities.[3] By 2186,[4] the Dragon Install started to "encroach",[3] making the transformation much more physical, with Sol's Gear form being dragon-like, with red and brown armored skin, wings and a tail, and being able to wrap his sword entirely in infernal flames. He uses the transformation against That Man, who observes that it has grown "this much"; although they engage in battle, Sol is unable to hurt That Man even then.[5]
Following the Baptisma 13 incident, Sol is once again covered in a dark aura, hinting at Sol modifying his limiter to suppress his powers, although not to the extent he was previously able to. In 2187, after the Cradle Incident, Sol foregoes using his Dragon Install entirely, as it would likely amplify the Information Flares, thus severely limiting his options in the fight against Ariels.[6] In the aftermath, Sol challenges Ky Kiske to a "real fight". Ky uses his war-time battlefield tactics, and Sol doesn't get the chance to transform, being defeated thoroughly.[7]
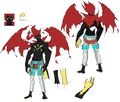
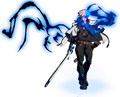
Three weeks later,[8] Sol loses the ability due to That Man returning him to humanity.[9] Meanwhile, Ky—previously limited to just manifesting a crimson eye[6][10]—develops the ability to do his own Dragon Install, and uses it against I-No.[9] Unlike Sol's, Ky's transformation is partial: the left half of his face turns black, his left eye changing colors (the iris becomes red and the sclera, jet black), and locks of hair turning neon-blue; a similarly-colored, scar-like mark travels down his left cheek. Ky's left arm turns dark blue entirely with his nails sharpening into claws, as well as a strange neon-blue marking akin to Justice's Gear emblem manifesting on the back of his hand; it constantly emits a dark aura, which during activation takes the shape of a wing.
Overview
Dragon Install
In combat, Dragon Install is not often very practical, despite Sol's massive increase in movement and attack speed (allowing several of his normals to be linked into one another), though in the increase in overall damage only applies to its original version from The Missing Link where it lasts a bit over 8 seconds total. Continuously using it within low HP while not refreshing the timer, makes the damage boost stack in multiples with itself. Even then, Sol has his tension gain halted for the duration of the state.
As of Guilty Gear X however, the overall damage boost is removed and is instead only a speed boost on both his movement and attack animations, as well as giving a number of extra properties on his special moves, such as turning Gun Flame into a tall-diagonal burst of fire, turning the ![]() version Volcanic Viper into a continuously rising attack leaving behind a huge vertical trail of fire (based on the Level 3 Volcanic Viper Charge Attack), and causing Bandit Revolver to have a flame trail along Sol's kick. Also, his standing
version Volcanic Viper into a continuously rising attack leaving behind a huge vertical trail of fire (based on the Level 3 Volcanic Viper Charge Attack), and causing Bandit Revolver to have a flame trail along Sol's kick. Also, his standing ![]() loses its jump cancel property for the duration. In Xrd, the effects of Dragon Install are more pronounced with more properties added across more of his special moves—accompanied by the song "Ride the Fire!"—, and lasts longer in Hellfire state. He can also access two exclusive moves: Slam in Λ Core Plus R and P.B.B in Xrd.
loses its jump cancel property for the duration. In Xrd, the effects of Dragon Install are more pronounced with more properties added across more of his special moves—accompanied by the song "Ride the Fire!"—, and lasts longer in Hellfire state. He can also access two exclusive moves: Slam in Λ Core Plus R and P.B.B in Xrd.
However, upon reaching his time limit, Sol enters a "pseudo-stunned" state (kneels on the ground clutching his head as he shakes it), leaving him vulnerable to attacks. Although Dragon Install possesses a great deal with start-up invincibility compared to most Overdrives, it is not recommended as a reversal, and the move is easily punishable in the open. The timings of his cancels and general combos are also vastly altered due to the increased speed, having less start-up time and ending lag, making control difficult. Ever since Slash, the mode instantly ends when Sol is knocked down, and Sol's stun resistance will drop as well. Before Xrd, Sol is also unable to use Bandit Bringer due to the upgrades to Bandit Revolver, as their inputs overlap.
Ky's version in Strive can only be activated when at 30% or lower HP, and is permanent for the rest of the round. During activation, it releases a shockwave with a hitbox that is short in horizontal range, but long vertically; if the opponent is in the corner, it will cause a Wall-Break. Similar to Sol's, it enhances Ky's special attacks and other Overdrives, but severely reduces his Tension gain, thus limiting his options for the rest of the round. Again, given its long startup and recovery, it is a generally unsafe move that either needs a combo or a hard knockdown prior to its activation.
It should be noted that throughout the series ever since Guilty Gear X Plus, Sol automatically has this state active permanently when fought or played as his Gold Mode version even with his normal color palette, especially within several important Story Mode battles he is involved in. Topping this off is that DI state even grants him Infinite Tension while providing him HP regeneration if he isn't hit (the regen will resume once Sol recovers from hitstun). So far within X Plus, XX and Λ Core Plus, Sol has had access to the Gold Mode DI state against Dizzy, Ky and I-No, all 3 being in their own Gold Mode states in trade (and thus Sol deciding there's no need to hold back to a degree).
- In Dizzy's case, the story-based context is normally Sol having to subdue her due to her powers going out of control, and only so far in X Plus. It is possible to lose against her in an X Plus story path case to reach an ending where Sol despite such a power-up, still loses due to Dizzy's will to live (which deeply seems to move him). In the games afterwards however, Sol seemingly no longer needs to require his Gold Mode to stand against Dizzy in such situations.
- In against Ky, it's normally due to him and Sol no longer deciding to hold back during a major conflict via specific story path taken. It is only in Ky's own story in both X Plus and Λ Core Plus however, that causes Sol to be in Gold Mode in their climatic fights (whereas in Sol's own case only in Λ Core Plus, it is Ky who would be in Gold Mode in both his and Order-Sol's story climaxes).
- In I-No's case, it's often involving a boss battle in her unique stage and against her infamous Boss/Gold version, as both deem that enough-is-enough and go all out. Though in both XX and Λ Core Plus' cases, only I-No's story allows Sol to be in Gold Mode while she herself is not.
Dragon Install 2nd
His Dragon Install 2nd, only present in the Λ Core updates (although present as a hidden move in the first Λ Core), requires 100% tension. The power state will install even if hit, and is permanent for the rest of the round. The startup is signified by Sol being stuck in the starting frame of the animation as the screen rumbles for a while, before the startup flash finally occurs. However, this 2nd version comes with notable downsides: it possesses no startup invulnerability whatsoever; Sol's tension gain is put to 20% of its original value, and Sol's health steadily decreases until 1 HP is left. This overall makes this version of very little worthwhile use.
Dragon Install Sakkai
Named after the Instant Kill mechanic in the original Guilty Gear, Order-Sol's Dragon Install: Sakkai (殺界; lit. Killing Realm), localized as "Morbid World" as of Λ Core Plus R, is a brief inescapable stagger attack instead, with the startup aura itself having a hitbox (with his Gear form appearing in a brief flash). Once it connects, Sol runs towards his foe. With strict timing, the player inputs a series of commands—the Sakkai/Morbid World follow-up—to continue with a series of attacks ending with a Tyrant Rave finisher.
If the foe is below a certain amount of health, Sol will instead enter his Gear form and finish with an Instant Kill. If the player fails at any point by missing the initial stagger or by doing an incorrect input, Sol will enter his pseudo-stunned state. Meanwhile, dropping the attack sequence deliberately at anytime with no input followup allows Order-Sol to recover normally. In Gold Mode, the combo proceeds without inputting commands.
It costs a Level 3 Charge Gauge and 100% Tension to perform, with the Tension cost reduced to 50% in Λ Core Plus R. Its activation command input was originally ![]()
![]()
![]()
![]()
![]()
![]()
![]()
![]()
![]()
![]() +
+ ![]() in Slash, but it was shortened to
in Slash, but it was shortened to ![]()
![]()
![]()
![]()
![]()
![]() +
+ ![]() from Λ Core onwards. The longer version remained as EX Order-Sol's input, however. The Sakkai/Morbid World section is:
from Λ Core onwards. The longer version remained as EX Order-Sol's input, however. The Sakkai/Morbid World section is:
 ,
,  ,
,  ,
,  ,
,  (slight pause), , , and a finisher


 + .
+ .
The original sequence from Slash had an initial ![]() , the aforementioned gatling sequence, and then finished with
, the aforementioned gatling sequence, and then finished with ![]()
![]()
![]()
![]()
![]()
![]()
![]()
![]() +
+ ![]() .
.
Sakkai's animations are in the following order:
- Third hit of a flameless Level 3 Rock It (done automatically upon running up to his staggered foe)
- Present Sol far standing
- Present Sol standing
- Flameless Volcanic Viper (doesn't rise as high as the original version and only does one hit)
- Bandit Revolver's second kick with no flame effects (done as Order-Sol falls from the prior input)
- Second hit of Level 2/3 Rock It
- Flameless Tyrant Rave ver. β's first hit
- Then finishing with a flameless Tyrant Rave ver. β's second hit.
The very final input afterwards with its own startup flash is Tyrant Rave ver. Ω's final upward recoil via the level 3 version (will launch instead of blowback if used to finish the opponent within the proper low HP threshold). When the low HP condition is properly triggered upon the recoil connecting, Sol will then enter his Gear form silhouette—with wings and a tail—while performing an altered Napalm Death, which is also more vertically angled and with the initial Overdrive flash freezing time before Sol leaps upward (thus the foe is suspended in midair for the duration). When he lands, in the aftermath Order-Sol returns to normal and is in his stunned-state animation, only he has his headband discarded and his long hair undone.
Flame Distortion
Order-Sol, as an Arcade boss in Slash and Λ Core, has an alternate version known as Flame Distortion. It can also be used by Gold Order-Sol, with the command ![]()
![]()
![]()
![]()
![]()
![]() +
+ ![]() . The visual cue is the screen blackening after the startup flash and Sol fading into the background just after an energy burst, then re-emerging with two flames crossing through his figure (from Level 3 Rock It).
. The visual cue is the screen blackening after the startup flash and Sol fading into the background just after an energy burst, then re-emerging with two flames crossing through his figure (from Level 3 Rock It).
Flame Distortion's benefits are twofold which last for around 10 seconds mirroring the Gold Mode present-Sol's own permanent Dragon Install: on top of the speed boost, it continuously fills up Order-Sol's Tension and Charge Gauges, and also grants the same HP regeneration on any difficulty settings higher than Beginner (unless he is getting hit, then the regeneration will halt for around a second when he recovers from hitstun). In most difficulties, his AI thus won't hesitate to abuse costly Tension-consuming moves in this state.
Upon depletion however unlike Gold present-Sol, Boss Order-Sol will lose all of his Tension and Charge Gauge should Flame Distortion expire (in Λ Core however, only the former is emptied) and will once again enter his pseudo-stunned state to be left open to attack.
Heavy Mob Cemetery
In Strive, Sol does not have Dragon Install as a state. Instead, using ![]()
![]()
![]()
![]()
![]()
![]() +
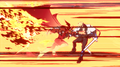
+ ![]() has him start an animation of removing his Gear Cell Suppressor. When complete, a cinematic plays where he fully throws it away and reaches at the opponent, burning away into his Gear form. Once the cinematic ends, he rushes across the stage, immune to any attack but still able to be slowed down. If he collides with the opponent, he grabs them and flies into the air before slamming them into the ground, setting off a massive eruption at the point of impact.
has him start an animation of removing his Gear Cell Suppressor. When complete, a cinematic plays where he fully throws it away and reaches at the opponent, burning away into his Gear form. Once the cinematic ends, he rushes across the stage, immune to any attack but still able to be slowed down. If he collides with the opponent, he grabs them and flies into the air before slamming them into the ground, setting off a massive eruption at the point of impact.
Despite full invulnerability, immense damage, and an untechable grab, the move is impractical. Opponents can cancel the move if they hit Sol during startup, and Sol cannot use it during combos unlike Jack-O Valentine's Forever Elysion Driver. In addition, Sol cannot use it to Wall Break, and Sol cannot grab airborne opponents, meaning they can jump over Sol.
Details
- Sol
| Game | Damage | T. Gain | Level0-4 range; stun time duration it causes | G. Type | Cancel | Frames |
|---|---|---|---|---|---|---|
| GG | None | -- | -- | -- | -- | ?Startup / ?Active / ?Recovery |
| GGX | None | -- | -- | -- | -- | ?Startup / ?Active / ?Recovery |
| GGXX | None | -- | -- | -- | -- | -Startup / -Active / 19+9Recovery (♯R)[11] 19+9Startup / -Active / 28 totalRecovery (ΛC)[12] 19+1Startup / -Active / 20 totalRecovery (ΛC+R)[13] |
| GGXX (Sakkai) | 30,20x8,230[14] | -- | -- | All[14] | RC[14] | 7+1Startup / 3Active / 68Recovery[14] |
| GGXX (2nd) | None | -- | -- | -- | -- | -Startup / -Active / 127 totalRecovery[12] |
| GGXrd | None | -- | -- | -- | YRC[15] | -Startup / -Active / 19 totalRecovery[15] |
| GGST (Mob) | 40,161[16] | -- | -- | Ground Throw[16] | -- | 13+7Startup / -Active / -Recovery[16] |
- Ky
| Game | Damage | T. Gain | Level0-4 range; stun time duration it causes | G. Type | Cancel | Frames |
|---|---|---|---|---|---|---|
| GGST | 40[17] | -- | -- | All[17] | -- | 21+1Startup / 5Active / 41 totalRecovery[17] |
Trivia
- The sequence of inputs for Dragon Install: Sakkai is likely a nod to the iconic Deadly Rave super move used by Geese Howard in the Fatal Fury and The King of Fighters series.
- Also in-name only, the Sakkai term also references the classic mechanic for how Instant Kills worked (the red screen indicator) back in the first Guilty Gear game.
- In Guilty Gear Isuka, both Kakusei Sol and Kakusei Ky appear to be almost permanently in a Dragon Install state. Notably, both Sol and Ky periodically go through a refresh period as their timer runs out, forcing them into the same pseudo-stunned state and leaving them open to attack before recovery in spite of their other advantages.
Gallery
Guilty Gear XX animated sprite.
Guilty Gear 2 -Overture- concept art.
Dragon Install: Sakkai animated.
Guilty Gear Vastedge concept art.

Guilty Gear Xrd animation.
Guilty Gear Xrd state.
Guilty Gear Xrd idle.
Guilty Gear -Strive- Heavy Mob Cemetery.
Guilty Gear -Strive- Ky's version.


References
- ↑ 1.0 1.1 1.2 [GGWorld - "Dragon Install"]
- ↑ Guilty Gear Xrd -Revelator- script § "Cause A"
- ↑ 3.0 3.1 Guilty Gear 2 -Overture- script § "Curtain Call"
- ↑ Guilty Gear Xrd -Sign- manual, pg.3-4
- ↑ Guilty Gear 2 -Overture- script § "Demon"
- ↑ 6.0 6.1 Guilty Gear Xrd -Revelator- script § "Fireworks"
- ↑ Guilty Gear Xrd Rev 2 script § "After Story A"
- ↑ Guilty Gear -Strive- script § "Prologue"
- ↑ 9.0 9.1 Guilty Gear -Strive- script § "Conclusion"
- ↑ Guilty Gear Xrd -Sign- script § "Resolution A"
- ↑ Dustloop Wiki - GGReload/Sol_Badguy
- ↑ 12.0 12.1 Dustloop Wiki - GGAC/Sol_Badguy
- ↑ Dustloop Wiki - GGACR/Sol_Badguy
- ↑ 14.0 14.1 14.2 14.3 Dustloop Wiki - GGACR/Order-Sol/Frame Data
- ↑ 15.0 15.1 Dustloop Wiki - GGXRD/Sol_Badguy
- ↑ 16.0 16.1 16.2 Dustloop Wiki - GGST/Sol_Badguy
- ↑ 17.0 17.1 17.2 Dustloop Wiki - GGST/Ky_Kiske